
.net

| Terms of service | ||||
|
Brokking |
.net |
Let's keep it simple |
|
|
|
Project YMFC-3D V2
How to get started fast? Click on question 1 on the
The YMFC-3D video series helped a lot of people to build their own Arduino quadcopter. I mainly started this video series for advanced Arduino users with RC experience. But it turned out that people with minor Arduino and RC experience start building the YMFC-3D quadcopter. And that of course is great! 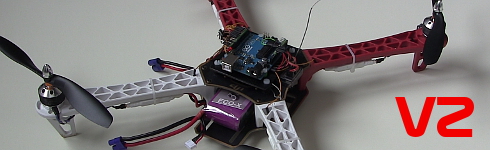
I kept the YMFC-3D code a simple as possible. This means that it takes more effort to get the quadcopter to fly. I filtered the YouTube comments and questions and made a list of the main problems that people experience when setting up the software.
1) Setting up the transmitter endpointsSome transmitters don't support endpoints / limits. This means that the source code needs to be modified by the user.2) The MPU-6050 cannot be usedA lot of people would like to use the all in one MPU-6050 gyro / accelerometer. The YMFC-3D code does not support the MPU-6050 gyro.3) Changing the I2C address of the gyroWhen using the L3GD20H it is necessary to change the gyro address in the source code.4) Motors don't start / LED keeps blinkingWhen the transmitter does not support endpoint / limits it's not possible to setup the endpoints correct and the motors cannot be started.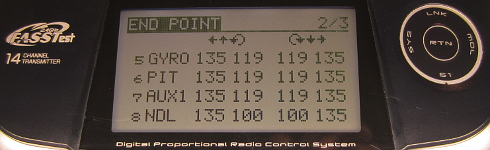
For an advanced Arduino user these points are easily overcome. But for beginners it's a complex challenge to get the YMFC-3d quadcopter to work. And that is something I want to end! To do this I'm starting to build the YMFC-3D version 2. This version will be 'smarter' and the setup procedure will be as simple as possible.
In short it means that the setup will be automated: All the settings are saved in the EEPROM. The main YMFC-3D V2 flight controller code will use these settings to calculate the gyro and receiver inputs. I'm currently testing the setup program so it can work with different gyro's. From left to right: MPU-6050, L3G4200D and the L3GD20H. 
Automating the code means that I have to modify a large part of the code. The basic principle will stay the same. But reading the EEPROM and automatically adapt the gyro and receiver data will be a challenge. 12-01-2016I'm making some nice progress. The setup program is almost done and the ESC calibration program is finished.
To test the software I need a new test quad. And to make it as realistic as possible I ordered some cheap ESC's and motors from DealExtreme:
In the title they make references to the DJI Flamewheel and 2212 motors. So they should be suitable for multirotors. But after the first test I noticed that the reaction speed is absolutely not the same as the DJI ESC. On the other hand, what should we expect for this amount of money. 
Let's not be too hasty with conclusions. They work and first I need to complete the quad so I can test the software and see if it fly's. 16-01-2016The Arduino sketches are ready! There are now three sketches that need to be uploaded one after the other:
1) Setup program for gyro and transmitter I already did a lot of software testing to make sure that everything is working as it supposed to. The upcoming day's I will try to do some flying with all the gyro's. The weather unfortunately is pretty bad at the moment. 17-01-2016Today I flew my quadcopter with the MPU-6050 and L3GD20H gyro in my backyard. The ESC's worked fine and the software performed without any glitches. A real milestone for this project. But I'm not finished yet. The thing that I already have done with the L3G4200D and L3GD20H is a 'noise' test. This means that I make a graph to visualize the output of the gyro with running motors. The quad does not move and the motors vibrate because I did not balance the props. Here you see the output of the L3GD20H and the MPU-6050. Both graphs are scaled form -15 to + 15 for comparison. 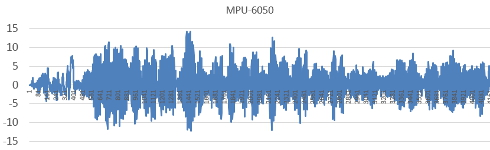
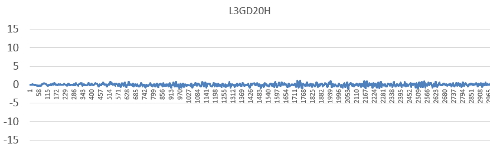
As you can see the L3GD20H is producing less noise with the same amount of vibrations. The thing that I have to do now is to find the correct MPU-6050 register setting so the noise rejection is optimal for flying. 18-01-201619-01-2016Most of the suggestions in the YouTube comments are implemented in the software. I also like to thank Varad who volunteered to tested the YMFC-3D V2 software and came up with some good ideas and useful feedback. I hope that most of you will understand that a project like this takes time.... a lot of time. The code is getting more complex and I want to test it as good as I can before I release it. A lot of people will use this code and it has to be perfect. Despite all that I'm currently working really hard on my website and an introduction video. If all goes well I will release the software on (European) Friday January 22, 2016. 21-01-2016
|
 YMFC-3D V2 Q and A page.